Difference between revisions of "Overlays"
(add explanation from Wolfgang) |
(Added description of overlay vs. layout from mailing list.) |
||
| Line 35: | Line 35: | ||
Another use for overlays is for adding a graphic to every page to indicate chapters (sometimes known as a [[Thumb index|thumb index]]). | Another use for overlays is for adding a graphic to every page to indicate chapters (sometimes known as a [[Thumb index|thumb index]]). | ||
| + | |||
| + | == Overlays vs. Layers == | ||
| + | |||
| + | Overlays and Layers are to different mechanism which are powerful when you combine both but first you have to know what each of them does. | ||
| + | |||
| + | === Overlays === | ||
| + | |||
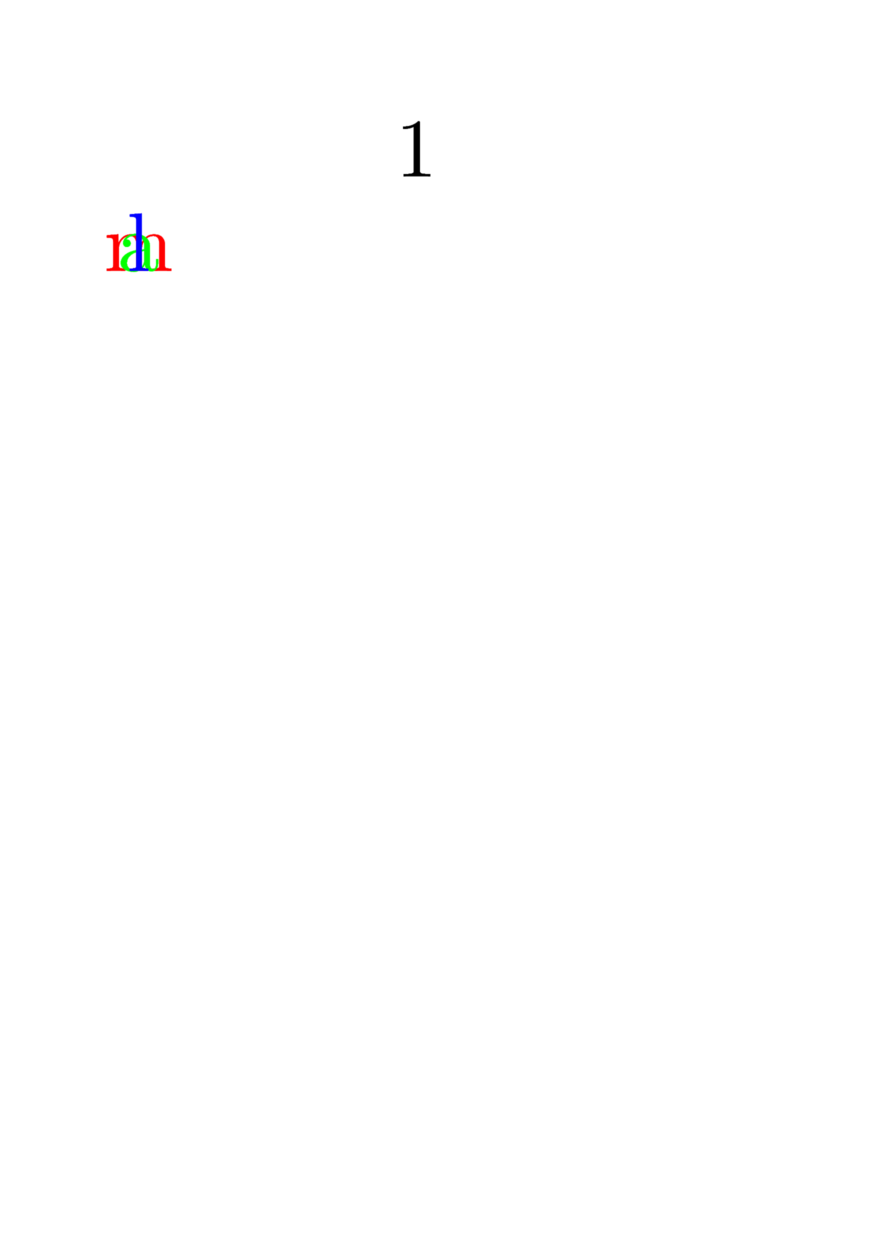
| + | ConTeXt has a overlay environment which cane used in the text to stack the arguments on the same spot. When take a close look at the example you can see each new element is placed on top of the previous element, when you remove the \strut in the argument you would also notice that each argument is placed horizontal and vertical centered. | ||
| + | |||
| + | <context source=yes> | ||
| + | \setupbodyfont[40pt] | ||
| + | |||
| + | \starttext | ||
| + | |||
| + | \startoverlay | ||
| + | {\strut\red m} | ||
| + | {\strut\green a} | ||
| + | {\strut\blue l} | ||
| + | \stopoverlay | ||
| + | |||
| + | \stoptext | ||
| + | </context> | ||
| + | |||
| + | After you do know now what overlays are I come to the real overlay mechanism. | ||
| + | |||
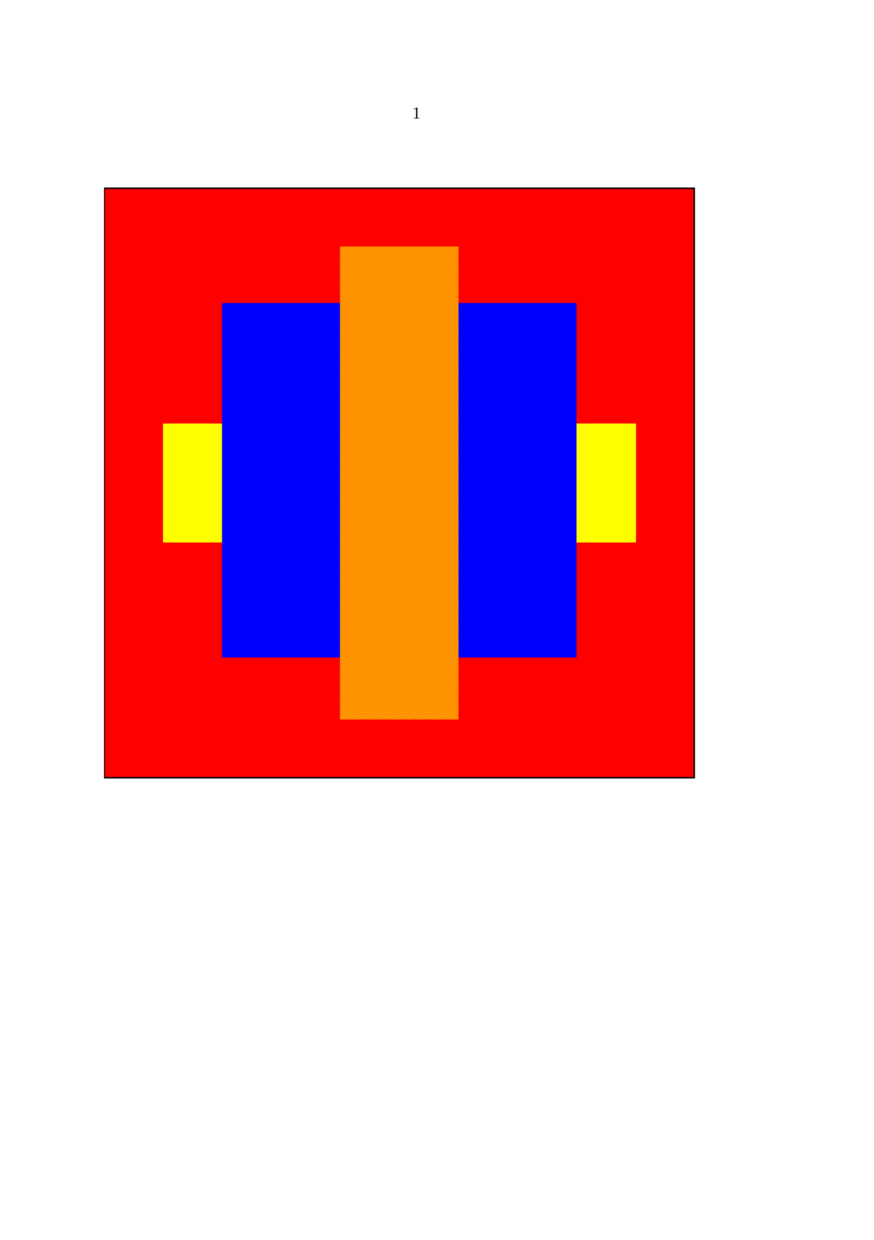
| + | Overlays are created with the \defineoverlay command which takes a name for the overlay and its content. The overlays are then applied to a \framed command or the background to the page the textblock, header etc. | ||
| + | |||
| + | In the next example I created two new overlays with the names “behind” and “before” (the name itself doesn’t matter) which I activated in the frame with tha background key. | ||
| + | |||
| + | <context source=yes> | ||
| + | \starttext | ||
| + | |||
| + | \defineoverlay[behind][{\blackrule[height=2cm,width=8cm,color=yellow]}] | ||
| + | \defineoverlay[before][{\blackrule[height=8cm,width=2cm,color=orange]}] | ||
| + | |||
| + | \framed | ||
| + | [width=10cm, | ||
| + | height=10cm, | ||
| + | background={color,behind,foreground,before}, | ||
| + | backgroundcolor=red] | ||
| + | {\blackrule[width=6cm,height=6cm,color=blue]} | ||
| + | |||
| + | \stoptext | ||
| + | </context> | ||
| + | |||
| + | When you look at the arguments of the background key you can used two more names besides my own “behind” and “before” overlays. The first name in the list “color” is needed when you can to use the argument of the backgroundcolor key which puts a color two the whole area of the frame. The second name “foreground” is more interesting because with this you can place overlays *before* the content of the frame because “foreground” is the frame text itself. | ||
| + | |||
| + | The differences between the overlay environment at the begin and the overlay mechanism for framed aren’t so big, only the methods to set them because in the first case you set the content for each level which the argument in braces ({…}{…}) and in the second case you define them first with \defineoverlay and set the order in the background key. | ||
| + | |||
| + | === Layers === | ||
| + | |||
| + | When you have used layers the content of each layer was always centered in the frame but with layers you can put the content from each command at a certain horizontal and vertical position. | ||
| + | |||
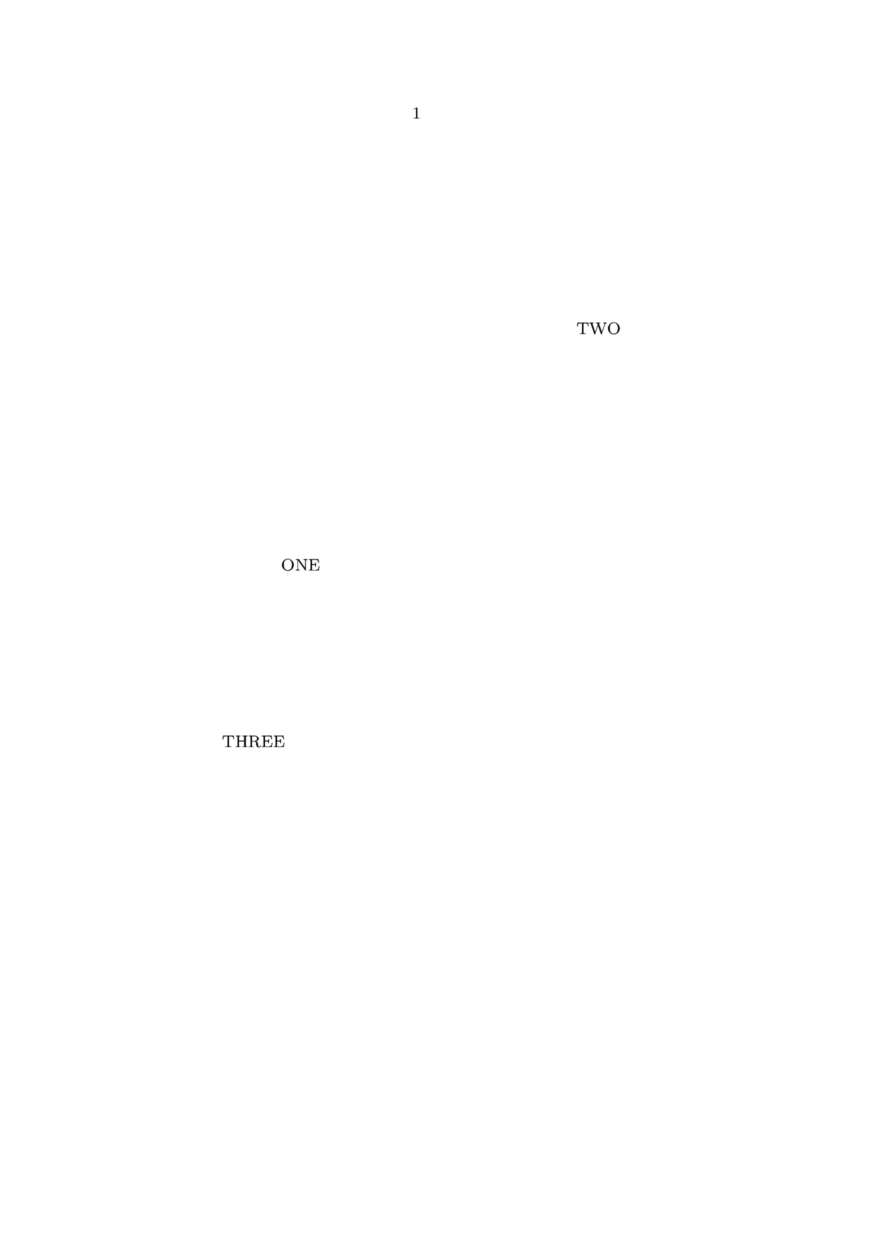
| + | In the following example I created a new layer and set three texts for it which are afterwards placed in the page which the \flushlayer command. | ||
| + | |||
| + | <context source=yes> | ||
| + | \starttext | ||
| + | |||
| + | \definelayer[test] | ||
| + | |||
| + | \setlayer[test][x=3cm,y=6cm]{ONE} | ||
| + | \setlayer[test][x=8cm,y=2cm]{TWO} | ||
| + | \setlayer[test][x=2cm,y=9cm]{THREE} | ||
| + | |||
| + | \flushlayer[test] | ||
| + | |||
| + | \stoptext | ||
| + | </context> | ||
| + | |||
| + | When you put new some text after \flushlayer would be surprised because it would end put on the following page but you shouldn’t wonder about this because layers have nothing to do with the page background or foreground. | ||
| + | |||
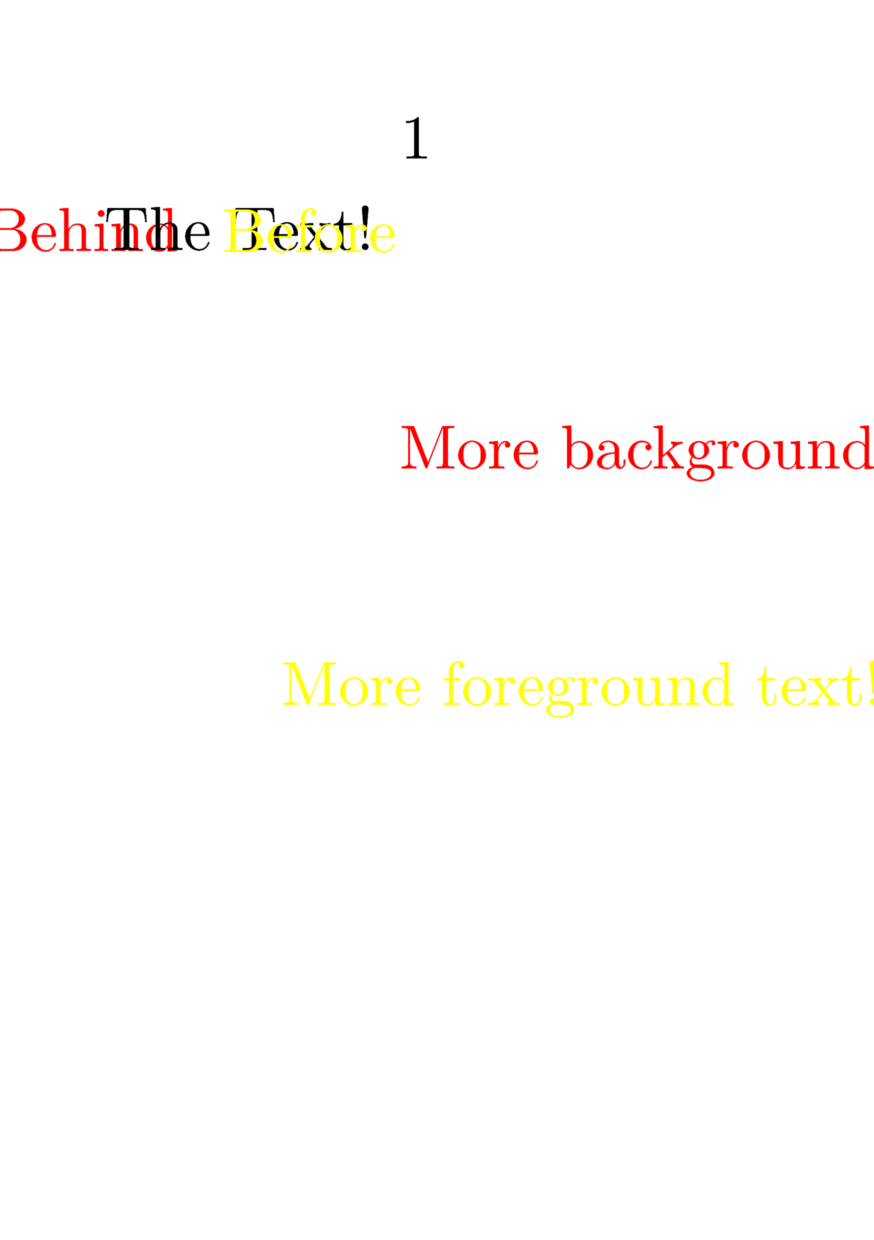
| + | What makes the layer and overlay mechanism is interesting is when you combine them and put the \flushlayer command in a overlay which does now place the texts before or after the content of a frame. With my next example we’re finally in the process to combine them. | ||
| + | |||
| + | <context source=yes> | ||
| + | \setupbodyfont[30pt] | ||
| + | |||
| + | \starttext | ||
| + | |||
| + | \definelayer[behindtext] | ||
| + | \definelayer[beforetext] | ||
| + | |||
| + | \setupbackgrounds[text][background={behindtext,foreground,beforetext}] | ||
| + | |||
| + | \setlayer[behindtext][x=-2cm,y=.75ex]{\red Behind} | ||
| + | \setlayer[beforetext][x=+2cm,y=.75ex]{\yellow Before} | ||
| + | |||
| + | The Text! | ||
| + | |||
| + | \setlayer[behindtext][x=5cm,y=4cm]{\red More background text!} | ||
| + | \setlayer[beforetext][x=3cm,y=8cm]{\yellow More foreground text!} | ||
| + | |||
| + | \stoptext | ||
| + | </context> | ||
| + | |||
| + | When you look at the example you can see that haven't created a overlay for layer even though I said you need it to put the layer after the text. This isn’t necessary because when you create a new layer context does also create a overlay with the same name in which the layer is placed. The other question is how you can place overlays on the text/page when I told before overalls can only be placed on frame, this is possible because all page elements (textblock, header, footer and even the page and paper itself) are frames. Even though these elements are frames they don’t provide all the options from \framed because they are a special version with less functionality. | ||
== See Also == | == See Also == | ||
* [[:Category:Command/Overlays]] | * [[:Category:Command/Overlays]] | ||
| − | |||
[[Category:Graphics]] | [[Category:Graphics]] | ||
Revision as of 18:53, 18 August 2013
< Graphics
Contents
What are Overlays?
Overlays are predefined snippets that you can stack on each other. In contrast to layers, which regard whole pages, overlays mostly are only single pictures, words or the like.
Defining
\defineoverlay[reference name][commands]
Better put your commands in braces.
Using
You can use defined overlays everywhere, where there's a background option.
\setupcolors[state=start]

\defineoverlay[tea][{\green\ss\bf GREEN TEA}]

\framed[
    background=tea,
    align={middle,hilo}
]{
    \em today
    \blank[2*big]
    for sale
}

You can use this also with pictures. See also logos.
Another use for overlays is for adding a graphic to every page to indicate chapters (sometimes known as a thumb index).
Overlays vs. Layers
Overlays and Layers are to different mechanism which are powerful when you combine both but first you have to know what each of them does.
Overlays
ConTeXt has a overlay environment which cane used in the text to stack the arguments on the same spot. When take a close look at the example you can see each new element is placed on top of the previous element, when you remove the \strut in the argument you would also notice that each argument is placed horizontal and vertical centered.
\setupbodyfont[40pt]

\starttext

\startoverlay
  {\strut\red   m}
  {\strut\green a}
  {\strut\blue  l}
\stopoverlay

\stoptext
After you do know now what overlays are I come to the real overlay mechanism.
Overlays are created with the \defineoverlay command which takes a name for the overlay and its content. The overlays are then applied to a \framed command or the background to the page the textblock, header etc.
In the next example I created two new overlays with the names “behind” and “before” (the name itself doesn’t matter) which I activated in the frame with tha background key.
\starttext

\defineoverlay[behind][{\blackrule[height=2cm,width=8cm,color=yellow]}]
\defineoverlay[before][{\blackrule[height=8cm,width=2cm,color=orange]}]

\framed
  [width=10cm,
   height=10cm,
   background={color,behind,foreground,before},
   backgroundcolor=red]
  {\blackrule[width=6cm,height=6cm,color=blue]}

\stoptext
When you look at the arguments of the background key you can used two more names besides my own “behind” and “before” overlays. The first name in the list “color” is needed when you can to use the argument of the backgroundcolor key which puts a color two the whole area of the frame. The second name “foreground” is more interesting because with this you can place overlays *before* the content of the frame because “foreground” is the frame text itself.
The differences between the overlay environment at the begin and the overlay mechanism for framed aren’t so big, only the methods to set them because in the first case you set the content for each level which the argument in braces ({…}{…}) and in the second case you define them first with \defineoverlay and set the order in the background key.
Layers
When you have used layers the content of each layer was always centered in the frame but with layers you can put the content from each command at a certain horizontal and vertical position.
In the following example I created a new layer and set three texts for it which are afterwards placed in the page which the \flushlayer command.
\starttext

\definelayer[test]

\setlayer[test][x=3cm,y=6cm]{ONE}
\setlayer[test][x=8cm,y=2cm]{TWO}
\setlayer[test][x=2cm,y=9cm]{THREE}

\flushlayer[test]

\stoptext
When you put new some text after \flushlayer would be surprised because it would end put on the following page but you shouldn’t wonder about this because layers have nothing to do with the page background or foreground.
What makes the layer and overlay mechanism is interesting is when you combine them and put the \flushlayer command in a overlay which does now place the texts before or after the content of a frame. With my next example we’re finally in the process to combine them.
\setupbodyfont[30pt]

\starttext

\definelayer[behindtext]
\definelayer[beforetext]

\setupbackgrounds[text][background={behindtext,foreground,beforetext}]

\setlayer[behindtext][x=-2cm,y=.75ex]{\red    Behind}
\setlayer[beforetext][x=+2cm,y=.75ex]{\yellow Before}

The Text!

\setlayer[behindtext][x=5cm,y=4cm]{\red    More background text!}
\setlayer[beforetext][x=3cm,y=8cm]{\yellow More foreground text!}

\stoptext
When you look at the example you can see that haven't created a overlay for layer even though I said you need it to put the layer after the text. This isn’t necessary because when you create a new layer context does also create a overlay with the same name in which the layer is placed. The other question is how you can place overlays on the text/page when I told before overalls can only be placed on frame, this is possible because all page elements (textblock, header, footer and even the page and paper itself) are frames. Even though these elements are frames they don’t provide all the options from \framed because they are a special version with less functionality.