Difference between revisions of "Table"
m (fixed link) |
m (Text replacement - "<cmd>" to "{{cmd|") |
||
| (22 intermediate revisions by 12 users not shown) | |||
| Line 1: | Line 1: | ||
< [[Tables Overview]] | [[Tabulate]] | [[Tables]] > | < [[Tables Overview]] | [[Tabulate]] | [[Tables]] > | ||
| − | This is ConTeXts oldest table module. It uses the same formatting as [[ | + | This is ConTeXts oldest table module. It uses the same formatting as [[Tabulate]] (see [[Tables Overview]]). |
| − | This mode is based on Michael Wichura's TaBlE package for PlainTeX. The official manual for it is commercial (about 40 USD), see [http://www.pctex.com/books.html PCTeX] -- but note that the TaBlE manual only talks about the original syntax, which does not use | + | This mode is based on Michael Wichura's TaBlE package for PlainTeX. The official manual for it is commercial (about 40 USD), see [http://www.pctex.com/books.html PCTeX] -- but note that the TaBlE manual only talks about the original syntax, which does not use {{cmd|NC}}, {{cmd|HL}} cum suis. |
| − | The only ConTeXt docs are in [[manual:ms-cb-en.pdf|ConTeXt - an excursion]]. | + | The only ConTeXt docs are in [[manual:ms-cb-en.pdf|ConTeXt - an excursion]]. There is also two introductory articles in tugboat [http://tug.org/TUGboat/Articles/tb28-3/tb90mahajan.pdf ConTeXt basics for users: Table macros] [http://www.tug.org/TUGboat/Articles/tb29-1/tb91mahajan.pdf Table macros II] by Aditya Mahajan (2007 and 2008). |
== Basic Commands == | == Basic Commands == | ||
| Line 52: | Line 52: | ||
</td></tr></table> | </td></tr></table> | ||
| − | * You get vertical lines (rules), if you use | + | * You get vertical lines (rules), if you use {{cmd|VL}} instead of {{cmd|NC}}. |
| − | * Better use | + | * Better use {{cmd|SR}}, {{cmd|FR}}, {{cmd|MR}}, {{cmd|LR}} instead of {{cmd|NR}}. |
| − | * You can also use | + | * You can also use {{cmd|AR}} instead of {{cmd|SR}}, {{cmd|FR}}, {{cmd|MR}} and {{cmd|LR}} (AR for automatic row). |
| − | * You can leave out the | + | * You can leave out the {{cmd|NC}} before the "row" command, but not if you use {{cmd|AR}} in a last or single row (see example). |
| − | * You can influence the table with | + | * You can influence the table with {{cmd|setuptables}}. |
| − | |||
==Column Definition== | ==Column Definition== | ||
| − | The table is defined by the template enclosed in square brackets after | + | The table is defined by the template enclosed in square brackets after {{cmd|starttable}}. The template has the form |
| − | <tt>|keys for the first column|keys for the second column|...|keys for the last column|</tt>. Please note that | + | <tt>|keys for the first column|keys for the second column|...|keys for the last column|</tt>. Please note that each column is surrounded by <tt>|</tt> signs. These are necessary. The formatting keys for each column can be a choice of |
| − | |||
<context> | <context> | ||
\switchtobodyfont[ss, 8pt] | \switchtobodyfont[ss, 8pt] | ||
| Line 86: | Line 84: | ||
\NC \type{r} \VL right-aligned column\AR | \NC \type{r} \VL right-aligned column\AR | ||
\NC \type{p(width)} \VL Set each cell as a paragraph\AR | \NC \type{p(width)} \VL Set each cell as a paragraph\AR | ||
| + | \NC \type{s(width)} \VL Specify the inter-column width\AR | ||
\NC \type{w} \VL Set minimum column width\AR | \NC \type{w} \VL Set minimum column width\AR | ||
\NC \type{k} \VL Insert a kern both left and right of the column\AR | \NC \type{k} \VL Insert a kern both left and right of the column\AR | ||
| Line 117: | Line 116: | ||
\stoptable | \stoptable | ||
</context> | </context> | ||
| − | + | ||
| − | === | + | === Column definition examples=== |
; <code>|l|</code> : a left aligned column, as wide as necessary | ; <code>|l|</code> : a left aligned column, as wide as necessary | ||
; <code>|lw(2cm)|</code> : a left aligned column of at least 2 cm width | ; <code>|lw(2cm)|</code> : a left aligned column of at least 2 cm width | ||
; <code>|p(2cm)|</code> : a centered(!) paragraph of 2 cm width | ; <code>|p(2cm)|</code> : a centered(!) paragraph of 2 cm width | ||
; <code>|lp(.5\textwidth)|</code> : a left aligned paragraph of specified width | ; <code>|lp(.5\textwidth)|</code> : a left aligned paragraph of specified width | ||
| + | ; <code>|rp(.5\textwidth)|</code> : a right aligned paragraph of specified width | ||
| + | ; <code>|cp(.5\textwidth)|</code> : a center aligned paragraph of specified width | ||
| + | ; <code>|xp(.5\textwidth)|</code> : a justified paragraph of specified width | ||
; <code>...</code> : Please add more | ; <code>...</code> : Please add more | ||
; <code>...</code> : | ; <code>...</code> : | ||
{{todo|add more examples of column definitions}} | {{todo|add more examples of column definitions}} | ||
| − | |||
==Column Spans== | ==Column Spans== | ||
| − | It's possible to create columnspans (i.e. cells that span more than one column) with the command | + | It's possible to create columnspans (i.e. cells that span more than one column) with the command {{cmd|use{<i>N</i>}}} where ''N'' is the number of columns spanned by the cell. It's often necessary to use {{cmd|ReFormat[<i>new keys</i>]{}}} to reformat this specific cell according to the ''new keys''. |
| Line 140: | Line 141: | ||
\NC \use{2}\ReFormat[cB]{Spanning head} \SR | \NC \use{2}\ReFormat[cB]{Spanning head} \SR | ||
\HL | \HL | ||
| − | \NC left | + | \NC \Use{2}[cB]{Spanning head} \SR % slightly shorted |
| − | \NC new row | + | \HL |
| − | \NC left | + | \NC left text \VL right column text \NC \AR |
| + | \NC new row \VL new row \NC \AR | ||
| + | \NC left text \VL \ReFormat[l]{reformatted} \NC \AR | ||
\HL | \HL | ||
\NC \use{2}Spanning entry \SR | \NC \use{2}Spanning entry \SR | ||
| Line 150: | Line 153: | ||
</td><td> | </td><td> | ||
<context> | <context> | ||
| + | \setuppapersize[A5] | ||
\starttable[s(0pt)|ls(10pt)|rs(0pt)|] | \starttable[s(0pt)|ls(10pt)|rs(0pt)|] | ||
\HL | \HL | ||
\NC \use{2}\ReFormat[cB]{Spanning head} \SR | \NC \use{2}\ReFormat[cB]{Spanning head} \SR | ||
\HL | \HL | ||
| − | \NC left | + | \NC \Use{2}[cB]{Spanning head} \SR |
| − | \NC new row | + | \HL |
| − | \NC left | + | \NC left text \VL right column text \NC \AR |
| + | \NC new row \VL new row \NC \AR | ||
| + | \NC left text \VL \ReFormat[l]{reformatted} \NC \AR | ||
\HL | \HL | ||
\NC \use{2}Spanning entry \SR | \NC \use{2}Spanning entry \SR | ||
| + | \HL | ||
| + | \stoptable | ||
| + | </context> | ||
| + | </td></tr></table> | ||
| + | |||
| + | |||
| + | ({{cmd|ReFormat}} can be abbreviated {{cmd|REF}} for brevity.) | ||
| + | == Row Spans== | ||
| + | |||
| + | It's also possible to create rowspans (i.e. cells that span more than one row) with the command {{cmd|Raise(<i>dimen</i>){<i>content</i>}}} or {{cmd|Lower(<i>dimen</i>){</i>content</i>}}} that raise or lower ''content'' by ''dimen''. | ||
| + | |||
| + | <table cols="2"><tr valign="top"><td> | ||
| + | <texcode> | ||
| + | \starttable[|c|c|] | ||
| + | \HL | ||
| + | \VL \Lower(.5\lineheight){a} \VL b \VL \AR | ||
| + | \DC \DL[1] \DR | ||
| + | \VL \VL c \VL \AR | ||
| + | \HL | ||
| + | \stoptable | ||
| + | </texcode> | ||
| + | </td><td> | ||
| + | <context> | ||
| + | \starttable[|c|c|] | ||
| + | \HL | ||
| + | \VL \Lower(.5\lineheight){a} \VL b \VL \AR | ||
| + | \DC \DL[1] \DR | ||
| + | \VL \VL c \VL \AR | ||
| + | \HL | ||
| + | \stoptable | ||
| + | </context> | ||
| + | </td></tr></table> | ||
| + | |||
| + | ({{cmd|Lower(.5\lineheight){a}}} can be abbreviated {{cmd|LOW{a}}} for brevity.) | ||
| + | |||
| + | An alternative means of spanning rows by a tall object makes use of a bit of TeX magic: | ||
| + | {{cmd|smash{tall object}}}: | ||
| + | |||
| + | <table cols="2"><tr valign="top"><td> | ||
| + | <texcode> | ||
| + | \starttable[|M|c|] | ||
| + | \HL | ||
| + | \VL \VL a \VL \AR | ||
| + | \DC \DL[1] \DR | ||
| + | \VL \smash{\sum_0^N} \VL b \VL \AR | ||
| + | \DC \DL[1] \DR | ||
| + | \VL \VL c \VL \AR | ||
| + | \HL | ||
| + | \stoptable | ||
| + | </texcode> | ||
| + | </td><td> | ||
| + | <context> | ||
| + | \starttable[|M|c|] | ||
| + | \HL | ||
| + | \VL \VL a \VL \AR | ||
| + | \DC \DL[1] \DR | ||
| + | \VL \smash{\sum_0^N} \VL b \VL \AR | ||
| + | \DC \DL[1] \DR | ||
| + | \VL \VL c \VL \AR | ||
\HL | \HL | ||
\stoptable | \stoptable | ||
| Line 174: | Line 239: | ||
* See [[Floating Objects]] in general. | * See [[Floating Objects]] in general. | ||
| − | * If you need information about | + | * If you need information about {{cmd|placetable}} look after {{cmd|placefloat}} in the manual or texshow! |
| − | * If you | + | * If you do not want a caption for your table, to get rid of it altogether you have to add "none" to settings and then leave the braces empty; if you only leave the braces empty, your table will still be numbered ("Table 1" etc.). |
| + | |||
| + | <texcode> | ||
| + | \placetable[here,none][tab:sample]{}{ | ||
| + | \starttable ... | ||
| + | \stoptable | ||
| + | } | ||
| + | </texcode> | ||
==Background Colors== | ==Background Colors== | ||
| − | A very nice application in table are background colors for rows/cells (a feature that doesn't work in [[ | + | Note: Adding color to tables using the `\CL` and `\BL` commands appears to be deprecated in MKIV; see: http://wiki.contextgarden.net/Tabulate |
| + | |||
| + | A very nice application in table are background colors for rows/cells (a feature that doesn't work in [[Tabulate]]): | ||
<table cols="2"><tr valign="top"><td> | <table cols="2"><tr valign="top"><td> | ||
| Line 187: | Line 261: | ||
\HL | \HL | ||
\BL[1]\SR | \BL[1]\SR | ||
| − | \NC Command \NC Meaning \SR | + | \NC Command \NC Meaning \NC\SR |
\HL | \HL | ||
| − | \NC \tex{NC} \NC next column \FR | + | \NC \tex{NC} \NC next column \NC\FR |
| − | \NC \tex{NR} \NC next row \LR | + | \NC \tex{NR} \NC next row \NC\LR |
\HL | \HL | ||
\CL[green]\SR | \CL[green]\SR | ||
| − | \NC \tex{AR} \NC automatic row \SR | + | \NC \tex{AR} \NC automatic row\NC\SR |
\HL | \HL | ||
\stoptable | \stoptable | ||
| Line 203: | Line 277: | ||
\HL | \HL | ||
\BL[1]\SR | \BL[1]\SR | ||
| − | \NC Command \NC Meaning \SR | + | \NC Command \NC Meaning \NC\SR |
\HL | \HL | ||
| − | \NC \tex{NC} \NC next column \FR | + | \NC \tex{NC} \NC next column \NC\FR |
| − | \NC \tex{NR} \NC next row \LR | + | \NC \tex{NR} \NC next row \NC\LR |
\HL | \HL | ||
\CL[green]\SR | \CL[green]\SR | ||
| − | \NC \tex{AR} \NC automatic row \SR | + | \NC \tex{AR} \NC automatic row\NC\SR |
\HL | \HL | ||
\stoptable | \stoptable | ||
| Line 220: | Line 294: | ||
won't cover the whole cell. | won't cover the whole cell. | ||
| − | * | + | * {{cmd|BL}} makes a gray background: the optional argument tells BL how many cells it should color |
| − | * | + | * {{cmd|CL}} makes a colored row |
==Fit Table Width== | ==Fit Table Width== | ||
| Line 238: | Line 312: | ||
<!-- It makes no sense to typeset this here. --> | <!-- It makes no sense to typeset this here. --> | ||
| + | Since table module has been under [http://www.ntg.nl/pipermail/ntg-context/2010/055004.html reconstruction] this approach works only for MKII. In MKIV one can use | ||
| + | |||
| + | <texcode> | ||
| + | \starttable[|l|l|][textwidth=max] | ||
| + | \HL | ||
| + | \VL foo foo foo foo foo foo \VL bar bar bar bar bar bar \VL\AR | ||
| + | \HL | ||
| + | \stoptable | ||
| + | </texcode> | ||
| + | |||
| + | to change the width of the current table only. | ||
| + | |||
| + | <code>\setuptables[textwidth=...]</code> will affect the behavior of every table. | ||
| + | |||
| + | == Booktabs == | ||
| + | |||
| + | Latex has an excellent package called booktabs for typesetting tables. The main features of that package is that you can have top, mid, and bottom rules of different thickness. It is possible to achieve similar effects using tables. For example, to match the default settings of booktabs (Well almost, this gives a top and bottom rules of 0.09em while booktabs sets it to 0.08em). | ||
| + | |||
| + | <table cols="2"><tr valign="top"><td> | ||
| + | <texcode> | ||
| + | \setuptables[rulethickness=0.03em] | ||
| + | |||
| + | \starttable[s0|l|i2l|i2r|] | ||
| + | \HL[3] | ||
| + | \NC \Use2[c]{Item} \NC \NC \AR | ||
| + | \DL[2] \DC \DR | ||
| + | \NC Animal \NC Description \NC Price (\$) \NC \AR | ||
| + | \HL[2] | ||
| + | \NC Gnat \NC per gram \NC 13.65 \NC \AR | ||
| + | \NC \NC each \NC 0.01 \NC \AR | ||
| + | \NC Gnu \NC stuffed \NC 92.50 \NC \AR | ||
| + | \NC Emu \NC stuffed \NC 33.33 \NC \AR | ||
| + | \NC Armadillo \NC frozen \NC 8.99 \NC \AR | ||
| + | \HL[3] | ||
| + | \stoptable | ||
| + | </texcode> | ||
| + | </td><td> | ||
| + | <context> | ||
| + | \setuppapersize[A5] | ||
| + | \setuptables[rulethickness=0.03em] | ||
| + | |||
| + | \starttable[s0|l|i2l|i2r|] | ||
| + | \HL[3] | ||
| + | \NC \Use2[c]{Item} \NC \NC \AR | ||
| + | \DL[2] \DC \DR | ||
| + | \NC Animal \NC Description \NC Price (\$) \NC \AR | ||
| + | \HL[2] | ||
| + | \NC Gnat \NC per gram \NC 13.65 \NC \AR | ||
| + | \NC \NC each \NC 0.01 \NC \AR | ||
| + | \NC Gnu \NC stuffed \NC 92.50 \NC \AR | ||
| + | \NC Emu \NC stuffed \NC 33.33 \NC \AR | ||
| + | \NC Armadillo \NC frozen \NC 8.99 \NC \AR | ||
| + | \HL[3] | ||
| + | \stoptable | ||
| + | </context> | ||
| + | </td></tr></table> | ||
[[Category:Tables]] | [[Category:Tables]] | ||
Revision as of 13:24, 9 August 2020
< Tables Overview | Tabulate | Tables >
This is ConTeXts oldest table module. It uses the same formatting as Tabulate (see Tables Overview).
This mode is based on Michael Wichura's TaBlE package for PlainTeX. The official manual for it is commercial (about 40 USD), see PCTeX -- but note that the TaBlE manual only talks about the original syntax, which does not use \NC, \HL cum suis.
The only ConTeXt docs are in ConTeXt - an excursion. There is also two introductory articles in tugboat ConTeXt basics for users: Table macros Table macros II by Aditya Mahajan (2007 and 2008).
Contents
Basic Commands
\starttable[|l|l|] \HL \NC Command \VL Meaning \SR % or \NC\AR \HL \NC \tex{NC} \VL next column \AR \NC \tex{HL} \VL horizontal line \AR \NC \tex{VL} \VL vertical line \AR \NC \tex{NR} \VL next row \LR \HL \NC \tex{SR} \VL single row \AR \NC \tex{FR} \VL first row \AR \NC \tex{MR} \VL middle row \AR \NC \tex{LR} \VL last row \LR % or \NC\AR \HL \NC \tex{AR} \VL automatic row \SR % or \NC\AR \HL \stoptable |
|
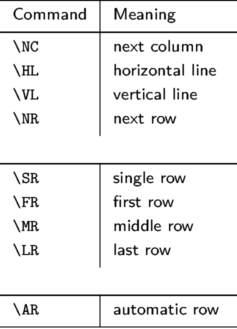
- You get vertical lines (rules), if you use \VL instead of \NC.
- Better use \SR, \FR, \MR, \LR instead of \NR.
- You can also use \AR instead of \SR, \FR, \MR and \LR (AR for automatic row).
- You can leave out the \NC before the "row" command, but not if you use \AR in a last or single row (see example).
- You can influence the table with \setuptables.
Column Definition
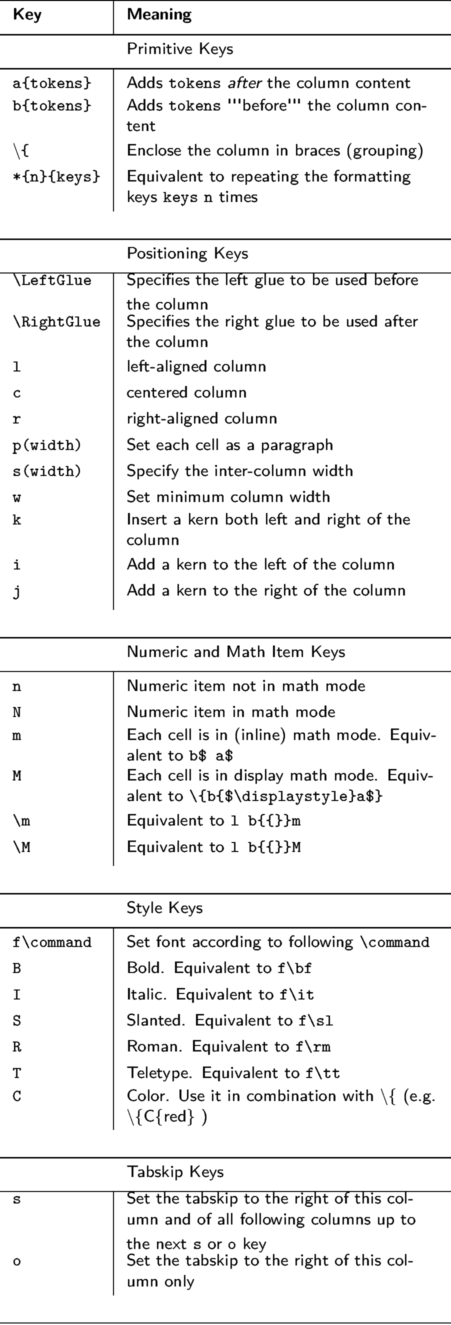
The table is defined by the template enclosed in square brackets after \starttable. The template has the form |keys for the first column|keys for the second column|...|keys for the last column|. Please note that each column is surrounded by | signs. These are necessary. The formatting keys for each column can be a choice of
Column definition examples
|l|- a left aligned column, as wide as necessary
|lw(2cm)|- a left aligned column of at least 2 cm width
|p(2cm)|- a centered(!) paragraph of 2 cm width
|lp(.5\textwidth)|- a left aligned paragraph of specified width
|rp(.5\textwidth)|- a right aligned paragraph of specified width
|cp(.5\textwidth)|- a center aligned paragraph of specified width
|xp(.5\textwidth)|- a justified paragraph of specified width
...- Please add more
...
 |
TODO: add more examples of column definitions (See: To-Do List) |
Column Spans
It's possible to create columnspans (i.e. cells that span more than one column) with the command [[Command/use{N|\use{N]]} where N is the number of columns spanned by the cell. It's often necessary to use [[Command/ReFormat[new keys]{|\ReFormat[new keys]{]]} to reformat this specific cell according to the new keys.
\starttable[s(0pt)|ls(10pt)|rs(0pt)|] \HL \NC \use{2}\ReFormat[cB]{Spanning head} \SR \HL \NC \Use{2}[cB]{Spanning head} \SR % slightly shorted \HL \NC left text \VL right column text \NC \AR \NC new row \VL new row \NC \AR \NC left text \VL \ReFormat[l]{reformatted} \NC \AR \HL \NC \use{2}Spanning entry \SR \HL \stoptable |
|
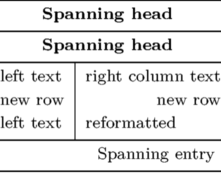
(\ReFormat can be abbreviated \REF for brevity.)
Row Spans
It's also possible to create rowspans (i.e. cells that span more than one row) with the command [[Command/Raise(dimen){content|\Raise(dimen){content]]} or [[Command/Lower(dimen){content|\Lower(dimen){content]]} that raise or lower content by dimen.
\starttable[|c|c|] \HL \VL \Lower(.5\lineheight){a} \VL b \VL \AR \DC \DL[1] \DR \VL \VL c \VL \AR \HL \stoptable |
|

([[Command/Lower(.5\lineheight){a|\Lower(.5\lineheight){a]]} can be abbreviated [[Command/LOW{a|\LOW{a]]} for brevity.)
An alternative means of spanning rows by a tall object makes use of a bit of TeX magic: [[Command/smash{tall object|\smash{tall object]]}:
\starttable[|M|c|] \HL \VL \VL a \VL \AR \DC \DL[1] \DR \VL \smash{\sum_0^N} \VL b \VL \AR \DC \DL[1] \DR \VL \VL c \VL \AR \HL \stoptable |
|

Table as Floating Object
\placetable[here][tab:sample]{sample table}{
\starttable ...
\stoptable
}
- See Floating Objects in general.
- If you need information about \placetable look after \placefloat in the manual or texshow!
- If you do not want a caption for your table, to get rid of it altogether you have to add "none" to settings and then leave the braces empty; if you only leave the braces empty, your table will still be numbered ("Table 1" etc.).
\placetable[here,none][tab:sample]{}{
\starttable ...
\stoptable
}
Background Colors
Note: Adding color to tables using the \CL and \BL commands appears to be deprecated in MKIV; see: http://wiki.contextgarden.net/Tabulate
A very nice application in table are background colors for rows/cells (a feature that doesn't work in Tabulate):
\setupcolors[state=start] \starttable[|l|l|] \HL \BL[1]\SR \NC Command \NC Meaning \NC\SR \HL \NC \tex{NC} \NC next column \NC\FR \NC \tex{NR} \NC next row \NC\LR \HL \CL[green]\SR \NC \tex{AR} \NC automatic row\NC\SR \HL \stoptable |
|
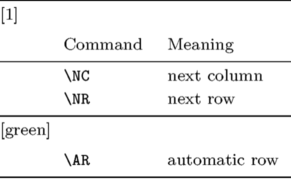
The commands work something like this: first, you say what background colour you want for the next row and then you typeset the row. Observe: the line with the colour-command and the row it is supposed to colour should end in the same command (i.e. both \SR, \LR, \FR, ...). If they don't, the background won't cover the whole cell.
- \BL makes a gray background: the optional argument tells BL how many cells it should color
- \CL makes a colored row
Fit Table Width
Hans posted a solution to the list for fitting a wide table (with paragraphs and vertical lines) to the page width. The key to his solution is the .45\textwidth settings when setting each cell as a paragraph.
\SetTableToWidth{\textwidth}

\starttable[|p(.45\textwidth)|p(.45\textwidth)|]
\HL
\VL foo foo foo foo foo foo \VL bar bar bar bar bar bar \VL\AR
\HL
\stoptable
Since table module has been under reconstruction this approach works only for MKII. In MKIV one can use
\starttable[|l|l|][textwidth=max]
\HL
\VL foo foo foo foo foo foo \VL bar bar bar bar bar bar \VL\AR
\HL
\stoptable
to change the width of the current table only.
\setuptables[textwidth=...] will affect the behavior of every table.
Booktabs
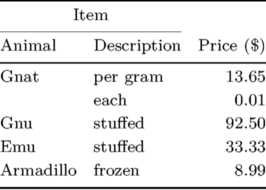
Latex has an excellent package called booktabs for typesetting tables. The main features of that package is that you can have top, mid, and bottom rules of different thickness. It is possible to achieve similar effects using tables. For example, to match the default settings of booktabs (Well almost, this gives a top and bottom rules of 0.09em while booktabs sets it to 0.08em).
\setuptables[rulethickness=0.03em] \starttable[s0|l|i2l|i2r|] \HL[3] \NC \Use2[c]{Item} \NC \NC \AR \DL[2] \DC \DR \NC Animal \NC Description \NC Price (\$) \NC \AR \HL[2] \NC Gnat \NC per gram \NC 13.65 \NC \AR \NC \NC each \NC 0.01 \NC \AR \NC Gnu \NC stuffed \NC 92.50 \NC \AR \NC Emu \NC stuffed \NC 33.33 \NC \AR \NC Armadillo \NC frozen \NC 8.99 \NC \AR \HL[3] \stoptable |
|