Difference between revisions of "Verbatim text"
| Line 325: | Line 325: | ||
Last line after an empty line | Last line after an empty line | ||
| + | \stopcode | ||
| + | </context> | ||
| + | |||
| + | === Continuing the numbering === | ||
| + | Another handy feature is the ability to continue the numbering from one portion of code to another. Use the option <tt>continue</tt> for this. | ||
| + | |||
| + | <texcode> | ||
| + | \startcode | ||
| + | This is the first line | ||
| + | This is a rather long line that is wrapped, so look how the line numbering is done | ||
| + | Another line | ||
| + | |||
| + | Last line after an empty line | ||
| + | \stopcode | ||
| + | |||
| + | Some normal text to explain the first piece of code, | ||
| + | and introduce the following lines. | ||
| + | |||
| + | \startcode[continue] | ||
| + | This is the first continuing line | ||
| + | This is a rather long line that is wrapped, so look how the line numbering is done | ||
| + | Another line | ||
| + | Last line | ||
| + | \stopcode | ||
| + | </texcode> | ||
| + | |||
| + | <context> | ||
| + | \defineframedtext | ||
| + | [framedcode] | ||
| + | [strut=yes, | ||
| + | offset=2mm, | ||
| + | width=7cm, | ||
| + | align=right] | ||
| + | |||
| + | \definetyping[code][numbering=line, | ||
| + | bodyfont=small, | ||
| + | before={\startframedcode}, | ||
| + | after={\stopframedcode}] | ||
| + | |||
| + | \startcode | ||
| + | This is the first line | ||
| + | This is a rather long line that is wrapped, so look how the line numbering is done | ||
| + | Another line | ||
| + | |||
| + | Last line after an empty line | ||
| + | \stopcode | ||
| + | |||
| + | Some normal text to explain the first piece of code, and introduce the following lines. | ||
| + | |||
| + | \startcode[continue] | ||
| + | This is the first continuing line | ||
| + | This is a rather long line that is wrapped, so look how the line numbering is done | ||
| + | Another line | ||
| + | Last line | ||
| + | \stopcode | ||
| + | </context> | ||
| + | |||
| + | === Arbitrary starting line number === | ||
| + | You can also decide what the starting line number is. Use the option <tt>start=number</tt> for this. | ||
| + | |||
| + | <texcode> | ||
| + | \startcode[start=200] | ||
| + | This is the first line | ||
| + | This is a rather long line that is wrapped, so look how the line numbering is done | ||
| + | Another line | ||
| + | Last line | ||
| + | \stopcode | ||
| + | </texcode> | ||
| + | |||
| + | <context> | ||
| + | \defineframedtext | ||
| + | [framedcode] | ||
| + | [strut=yes, | ||
| + | offset=2mm, | ||
| + | width=7cm, | ||
| + | align=right] | ||
| + | |||
| + | \definetyping[code][numbering=line, | ||
| + | bodyfont=small, | ||
| + | before={\startframedcode}, | ||
| + | after={\stopframedcode}] | ||
| + | |||
| + | \startcode[start=200] | ||
| + | This is the first line | ||
| + | This is a rather long line that is wrapped, so look how the line numbering is done | ||
| + | Another line | ||
| + | Last line | ||
\stopcode | \stopcode | ||
</context> | </context> | ||
Revision as of 21:32, 10 May 2006
< Visuals | Verbatim with line breaks >
Displayed text
In-line text
\startTEX ... \stopTEX only works when typesetting the whole paragraph. If you need to type only a command or two as in-line text, you can use the following Taco's macro (hopefully this will land in the core once in the future):
\def\typeTEX
  {\bgroup
   \def\processinlineverbatim##1%
     {\processingverbatimtrue
      \localcatcodestrue
      \def\endofverbatimcommand{\TEXendofcommand##1}%
      \bgroup
      \aftergroup\endofverbatimcommand
      \futurelet\next\doprocessinlineverbatim}%
   \initializetyping{TEX}%
   \startverbatimcolor
   \processinlineverbatim\egroup }
Now you can say:
\typeTEX+\typeTEX{\typeTEX is a wonderful macro}+, isn't it?

Source: [1]
Interesting features
Unlike LaTeX's verbatim environment, ConTeXt's typing environments have quite a range of built-in options for formatting the verbatim text.
Embedded formatting commands
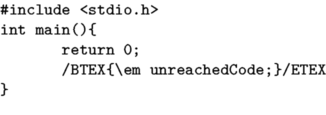
The option=commands setting allows the usage of ConTeXt commands inside verbatim text, as in this example:
\definetyping[C][option=commands]
\startC
#include <stdio.h>
int main(){
	return 0;
	/BTEX{\em unreachedCode;}/ETEX
}
\stopC
Tabbing
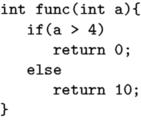
The tab character normally corresponds to one character, as can be seen above. That value can be adjusted, using the following code (available in the 2005.06.01 version and later):
\definetyping[C][tab=3]
% for older ConTeXt versions: \chardef\spacespertab=3
\startC
int func(int a){
	if(a > 4)
		return 0;
	else
		return 10;
}
\stopC
Syntax highlighting in color
\setupcolors[state=start]
\setuptyping[option=color]

\starttext
\startXML
... your XML code ...
\stopXML
\stoptext

Defining your own set of colors
Sometimes you may be not quite satisfied with the default colors used in the built-in syntax highlighting. Taco posted this solution in the discussion on the mailing list:
\setupcolors[state=start]
\setuptyping[option=color]

% define the colors to fit your document style
\definecolor[MYcolorone]  [r=.8,g=.5,b=.5]
\definecolor[MYcolortwo]  [r=.8,g=.5,b=.2]
\definecolor[MYcolorthree][r=.8,g=.5,b=.8]
\definecolor[MYcolorfour] [r=.8,g=.2,b=.5]

% define a palete using these four colors
\definepalet[MYcolors]
  [prettyone=MYcolorone,
   prettytwo=MYcolortwo,
   prettythree=MYcolorthree,
   prettyfour=MYcolorfour]

% XML code will be typeset with the palette you just defined
\definepalet[XMLcolorpretty] [MYcolors] % the name is magic !

\starttext
\startXML
... your XML code ...
\stopXML
\stoptext
This results in:

Line numbering
In technical documents it can be required to display some code listings with the line numbers. You can do this with ConTeXt, and even more. All the features shown here are available when displaying external files with \typefile.
Preliminary setting
Let's define our own typing style, named "code". The typing is put in a framedtext, to demonstrate the wrapping feature in a next section.
\defineframedtext
  [framedcode]
  [strut=yes,
   offset=2mm,
   width=7cm,
   align=right]

\definetyping[code][numbering=line,
                    bodyfont=small,
                    before={\startframedcode},
                    after={\stopframedcode}]
Default line numbering
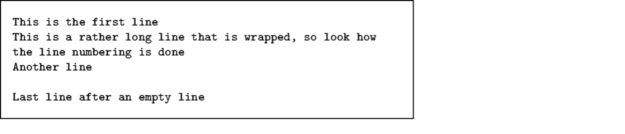
With the defined typing, every line is numbered, and the number goes in the margin. The option to have the line numbers displayed is numbering=line.
\startcode
This is the first line
This is a rather long line that is wrapped, so look how the line numbering is done
Another line

Last line after an empty line
\stopcode
It is rendered as:
Line numbers in the text
To have the line numbers in the text, change the linenumbering setup like this:
\setuplinenumbering[location=intext]
\startcode
This is the first line
This is a rather long line that is wrapped, so look how the line numbering is done
Another line

Last line after an empty line
\stopcode

Continuing the numbering
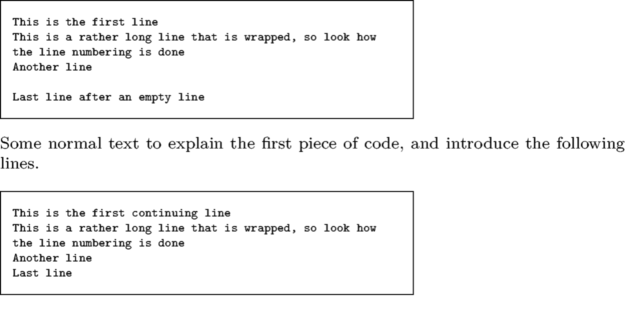
Another handy feature is the ability to continue the numbering from one portion of code to another. Use the option continue for this.
\startcode
This is the first line
This is a rather long line that is wrapped, so look how the line numbering is done
Another line

Last line after an empty line
\stopcode

Some normal text to explain the first piece of code,
and introduce the following lines.

\startcode[continue]
This is the first continuing line
This is a rather long line that is wrapped, so look how the line numbering is done
Another line
Last line
\stopcode
Arbitrary starting line number
You can also decide what the starting line number is. Use the option start=number for this.
\startcode[start=200]
This is the first line
This is a rather long line that is wrapped, so look how the line numbering is done
Another line
Last line
\stopcode
