Difference between revisions of "Verbatim text"
(cleanup, list of included languages, how to make a new formatter) |
|||
| Line 4: | Line 4: | ||
<cmd>starttyping</cmd>, | <cmd>starttyping</cmd>, | ||
<cmd>typebuffer</cmd> | <cmd>typebuffer</cmd> | ||
| + | |||
| + | Unlike LaTeX's <code>verbatim</code> environment, ConTeXt's <code>typing</code> environments have quite a range of built-in options for formatting the verbatim text, see below. | ||
=In-line text= | =In-line text= | ||
| Line 49: | Line 51: | ||
Source: [http://archive.contextgarden.net/thread/20050907.093522.baf795f5.en.html] | Source: [http://archive.contextgarden.net/thread/20050907.093522.baf795f5.en.html] | ||
| − | + | = Embedded formatting commands = | |
| − | |||
| − | |||
| − | |||
| − | |||
The <tt>option=commands</tt> setting allows the usage of ConTeXt commands inside verbatim text, as in this example: | The <tt>option=commands</tt> setting allows the usage of ConTeXt commands inside verbatim text, as in this example: | ||
| Line 78: | Line 76: | ||
</context> | </context> | ||
| − | == Tabbing | + | == Included Formatters == |
| + | |||
| + | There are already some formatters for several programming languages in the ConTeXt distribution: | ||
| + | |||
| + | {| | ||
| + | ! Code !! Language | ||
| + | |- | ||
| + | | [[source:verb-c.tex|C]] || C | ||
| + | |- | ||
| + | | [[source:verb-eif.tex|EIF]] || Eiffel | ||
| + | |- | ||
| + | | [[source:verb-js.tex|JS]] || JavaScript | ||
| + | |- | ||
| + | | [[source:verb-jv.tex|JV]] || Java | ||
| + | |- | ||
| + | | [[source:verb-mp.tex|MP]] || MetaPost & MetaFont | ||
| + | |- | ||
| + | | [[source:verb-pas.tex|PAS]] || Pascal & Modula | ||
| + | |- | ||
| + | | [[source:verb-pl.tex|PL]] || Perl 5 | ||
| + | |- | ||
| + | | [[source:verb-sql.tex|SQL]] || SQL | ||
| + | |- | ||
| + | | [[source:verb-tex.tex|TEX]] || TeX | ||
| + | |- | ||
| + | | [[source:verb-xml.tex|XML]] || XML | ||
| + | |- | ||
| + | |} | ||
| + | |||
| + | == Your own formatter == | ||
| + | |||
| + | (from a ML answer by Taco, 2006-12-25, "Making a verbatim file for another language") | ||
| + | |||
| + | You should start from the definition that is closest to the language you want to define (especially wrt comment and string syntax) and can probably have a go at making a version of this. Some | ||
| + | questions occur: | ||
| + | |||
| + | === Where should i put my file? === | ||
| + | |||
| + | # Possibly the best place is: In the context distribution, but that depends a bit on what language it is, precisely (you can email me the completed file, in that case). | ||
| + | # Second best place: http://modules.contextgarden.net, so it can be included in cont-ext.zip (third-party addons that are distributed by Pragma-Ade alongside the normal distribution). | ||
| + | # Third best: The directory <$HOME/texmf/tex/context/base> (the place where your TeX installation finds local files). | ||
| + | # Final option: Same directory as the file to be processed | ||
| + | |||
| + | === Do I have to do anything else to get ConTeXt to recognise and use it? === | ||
| + | |||
| + | Your file has to have a name like <tt>verb-xxxx.tex</tt>, with <tt>xxxx</tt> a lowercase short identifier (example: verb-php.tex), and then you have to use one or two commands to make ConTeXt use the file. | ||
| + | |||
| + | First: | ||
| + | <texcode> | ||
| + | \installprettytype [PHP] [PHP] | ||
| + | </texcode> | ||
| + | This maps the command <code>\starttyping[option=PHP]</code> to <tt>verb-php.tex</tt>. | ||
| + | |||
| + | The first argument is the option as passed to \starttyping, the second argument is an uppercase version of <tt>xxxx</tt> (thus allowing ConTeXt to find the file), | ||
| + | |||
| + | And you probably also want: | ||
| + | <texcode> | ||
| + | \definetyping[PHP] [option=PHP] | ||
| + | </texcode> | ||
| + | Because that allows <code>\startPHP ... \stopPHP</code> as a shortcut to <tt>\setuptyping[option=PHP]</tt> | ||
| + | |||
| + | |||
| + | = Tabbing = | ||
The tab character normally corresponds to one character, as can be seen above. That value can be adjusted, using the following code (available in the 2005.06.01 version and later): | The tab character normally corresponds to one character, as can be seen above. That value can be adjusted, using the following code (available in the 2005.06.01 version and later): | ||
| Line 106: | Line 166: | ||
</context> | </context> | ||
| − | + | = Syntax highlighting in color = | |
<texcode> | <texcode> | ||
| Line 233: | Line 293: | ||
</context> | </context> | ||
| − | + | = Line numbering = | |
In technical documents it can be required to display some code listings with the line numbers. You can do this with ConTeXt, and even more. All the features shown here are also available when displaying external files with <cmd>typefile</cmd>. | In technical documents it can be required to display some code listings with the line numbers. You can do this with ConTeXt, and even more. All the features shown here are also available when displaying external files with <cmd>typefile</cmd>. | ||
| − | + | == Preliminary setting == | |
Let's define our own typing style, named "code". The typing is put in a framedtext, to demonstrate the wrapping feature in a next section. | Let's define our own typing style, named "code". The typing is put in a framedtext, to demonstrate the wrapping feature in a next section. | ||
| Line 254: | Line 314: | ||
</texcode> | </texcode> | ||
| − | + | == Default line numbering == | |
With the defined typing, every line is numbered, and the number goes in the margin. The option to have the line numbers displayed is <tt>numbering=line</tt>. | With the defined typing, every line is numbered, and the number goes in the margin. The option to have the line numbers displayed is <tt>numbering=line</tt>. | ||
| Line 291: | Line 351: | ||
</context> | </context> | ||
| − | + | == Line numbers in the text == | |
To have the line numbers in the text, change the linenumbering setup like this: | To have the line numbers in the text, change the linenumbering setup like this: | ||
| Line 328: | Line 388: | ||
</context> | </context> | ||
| − | + | == Continuing the numbering == | |
Another handy feature is the ability to continue the numbering from one portion of code to another. Use the option <tt>continue</tt> for this. | Another handy feature is the ability to continue the numbering from one portion of code to another. Use the option <tt>continue</tt> for this. | ||
| Line 382: | Line 442: | ||
</context> | </context> | ||
| − | + | == Arbitrary starting line number == | |
You can also decide what the starting line number is. Use the option <tt>start=number</tt> for this. | You can also decide what the starting line number is. Use the option <tt>start=number</tt> for this. | ||
| Line 415: | Line 475: | ||
</context> | </context> | ||
| − | + | == Line number steps == | |
You want to print a number every two lines? Ok, just use the option <tt>step=number</tt> for this. | You want to print a number every two lines? Ok, just use the option <tt>step=number</tt> for this. | ||
Revision as of 16:57, 26 December 2006
< Visuals | Verbatim with line breaks >
Contents
Displayed text
Unlike LaTeX's verbatim environment, ConTeXt's typing environments have quite a range of built-in options for formatting the verbatim text, see below.
In-line text
\startTEX ... \stopTEX only works when typesetting the whole paragraph. If you need to type only a command or two as in-line text, you can use the following Taco's macro (hopefully this will land in the core once in the future):
\def\typeTEX
  {\bgroup
   \def\processinlineverbatim##1%
     {\processingverbatimtrue
      \localcatcodestrue
      \def\endofverbatimcommand{\TEXendofcommand##1}%
      \bgroup
      \aftergroup\endofverbatimcommand
      \futurelet\next\doprocessinlineverbatim}%
   \initializetyping{TEX}%
   \startverbatimcolor
   \processinlineverbatim\egroup }
Now you can say:
\typeTEX+\typeTEX{\typeTEX is a wonderful macro}+, isn't it?

Source: [1]
Embedded formatting commands
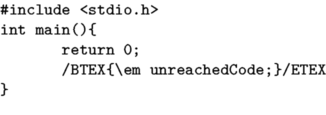
The option=commands setting allows the usage of ConTeXt commands inside verbatim text, as in this example:
\definetyping[C][option=commands]
\startC
#include <stdio.h>
int main(){
	return 0;
	/BTEX{\em unreachedCode;}/ETEX
}
\stopC
Included Formatters
There are already some formatters for several programming languages in the ConTeXt distribution:
| Code | Language |
|---|---|
| C | C |
| EIF | Eiffel |
| JS | JavaScript |
| JV | Java |
| MP | MetaPost & MetaFont |
| PAS | Pascal & Modula |
| PL | Perl 5 |
| SQL | SQL |
| TEX | TeX |
| XML | XML |
Your own formatter
(from a ML answer by Taco, 2006-12-25, "Making a verbatim file for another language")
You should start from the definition that is closest to the language you want to define (especially wrt comment and string syntax) and can probably have a go at making a version of this. Some questions occur:
Where should i put my file?
- Possibly the best place is: In the context distribution, but that depends a bit on what language it is, precisely (you can email me the completed file, in that case).
- Second best place: http://modules.contextgarden.net, so it can be included in cont-ext.zip (third-party addons that are distributed by Pragma-Ade alongside the normal distribution).
- Third best: The directory <$HOME/texmf/tex/context/base> (the place where your TeX installation finds local files).
- Final option: Same directory as the file to be processed
Do I have to do anything else to get ConTeXt to recognise and use it?
Your file has to have a name like verb-xxxx.tex, with xxxx a lowercase short identifier (example: verb-php.tex), and then you have to use one or two commands to make ConTeXt use the file.
First:
\installprettytype [PHP] [PHP]
This maps the command \starttyping[option=PHP] to verb-php.tex.
The first argument is the option as passed to \starttyping, the second argument is an uppercase version of xxxx (thus allowing ConTeXt to find the file),
And you probably also want:
\definetyping[PHP] [option=PHP]
Because that allows \startPHP ... \stopPHP as a shortcut to \setuptyping[option=PHP]
Tabbing
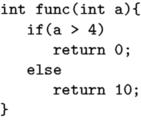
The tab character normally corresponds to one character, as can be seen above. That value can be adjusted, using the following code (available in the 2005.06.01 version and later):
\definetyping[C][tab=3]
% for older ConTeXt versions: \chardef\spacespertab=3
\startC
int func(int a){
	if(a > 4)
		return 0;
	else
		return 10;
}
\stopC
Syntax highlighting in color
\setupcolors[state=start]
\setuptyping[option=color]

\starttext
\startXML
... your XML code ...
\stopXML
\stoptext

Defining your own set of colors
Sometimes you may be not quite satisfied with the default colors used in the built-in syntax highlighting. Taco posted this solution in the discussion on the mailing list:
\setupcolors[state=start]
\setuptyping[option=color]

% define the colors to fit your document style
\definecolor[MYcolorone]  [r=.8,g=.5,b=.5]
\definecolor[MYcolortwo]  [r=.8,g=.5,b=.2]
\definecolor[MYcolorthree][r=.8,g=.5,b=.8]
\definecolor[MYcolorfour] [r=.8,g=.2,b=.5]

% define a palete using these four colors
\definepalet[MYcolors]
  [prettyone=MYcolorone,
   prettytwo=MYcolortwo,
   prettythree=MYcolorthree,
   prettyfour=MYcolorfour]

% XML code will be typeset with the palette you just defined
\definepalet[XMLcolorpretty] [MYcolors] % the name is magic !

\starttext
\startXML
... your XML code ...
\stopXML
\stoptext
This results in:

Line numbering
In technical documents it can be required to display some code listings with the line numbers. You can do this with ConTeXt, and even more. All the features shown here are also available when displaying external files with \typefile.
Preliminary setting
Let's define our own typing style, named "code". The typing is put in a framedtext, to demonstrate the wrapping feature in a next section.
\defineframedtext
  [framedcode]
  [strut=yes,
   offset=2mm,
   width=7cm,
   align=right]

\definetyping[code][numbering=line,
                    bodyfont=small,
                    before={\startframedcode},
                    after={\stopframedcode}]
Default line numbering
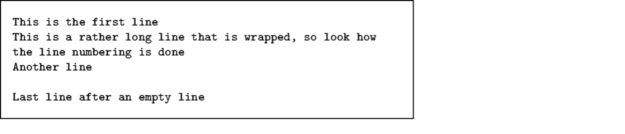
With the defined typing, every line is numbered, and the number goes in the margin. The option to have the line numbers displayed is numbering=line.
\startcode
This is the first line
This is a rather long line that is wrapped, so look how the line numbering is done
Another line

Last line after an empty line
\stopcode
It is rendered as:
Line numbers in the text
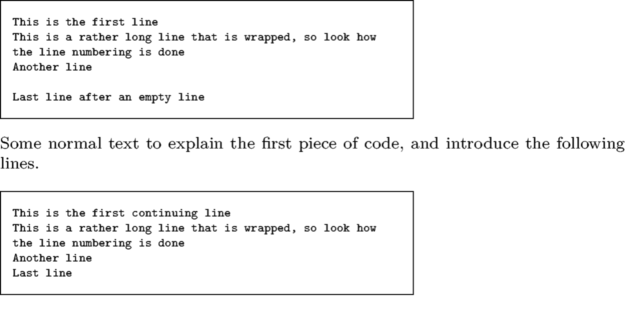
To have the line numbers in the text, change the linenumbering setup like this:
\setuplinenumbering[location=intext]
\startcode
This is the first line
This is a rather long line that is wrapped, so look how the line numbering is done
Another line

Last line after an empty line
\stopcode

Continuing the numbering
Another handy feature is the ability to continue the numbering from one portion of code to another. Use the option continue for this.
\startcode
This is the first line
This is a rather long line that is wrapped, so look how the line numbering is done
Another line

Last line after an empty line
\stopcode

Some normal text to explain the first piece of code,
and introduce the following lines.

\startcode[continue]
This is the first continuing line
This is a rather long line that is wrapped, so look how the line numbering is done
Another line
Last line
\stopcode
Arbitrary starting line number
You can also decide what the starting line number is. Use the option start=number for this.
\startcode[start=200]
This is the first line
This is a rather long line that is wrapped, so look how the line numbering is done
Another line
Last line
\stopcode

Line number steps
You want to print a number every two lines? Ok, just use the option step=number for this.
\startcode[start=200,step=2]
This is the first line
This is a rather long line that is wrapped, so look how the line numbering is done
Another line
Last line
\stopcode
